How To Reduce Joint Pain And Improve Strength With Resistance Bands In 5 Easy Steps
If you’ve ever thought, “I’d love to get stronger and more mobile, but my joints just won’t let me,” you’re not alone. Many seniors deal with stiff knees, sore hips, or cranky shoulders. The frustrating part is that these aches can make everyday tasks—like getting out of a chair, climbing stairs, or reaching up to grab something—feel harder than they should.
Here’s the good news: movement is medicine. When done right, the right kind of exercise can actually reduce joint pain, not make it worse. The key is choosing safe, gentle, joint-friendly exercises that build strength without putting unnecessary stress on your body.
That’s where resistance bands come in.
Why Resistance Bands Are Perfect for Seniors with Joint Pain
If you’ve never used resistance bands before, imagine a stretchy rubber band, only bigger, safer, and designed for exercise. They provide gentle resistance, which helps strengthen your muscles while going easy on your joints.
Unlike heavy gym machines or dumbbells, bands are:
- Lightweight and portable – toss them in a drawer or suitcase.
- Adjustable – use a lighter band on stiff days and a stronger one as you get fitter.
- Joint-friendly – the resistance increases gradually, so there’s no jarring pressure.
- Affordable – you can pick up a whole set for less than the cost of one personal training session.
👉 My go-to recommendation: FitLife Resistance Bands. They come color-coded for different strengths, are easy to use at home, and perfect for beginners.
The Goal: Stronger Muscles, Happier Joints
A lot of people assume joint pain means they should avoid exercise. In reality, avoiding movement usually makes the problem worse. When the muscles around your joints are weak, the joints take on more of the load—and that’s when pain kicks in.
By gently strengthening the muscles around your knees, hips, and shoulders, you’re essentially giving your joints a protective cushion. Think of it like upgrading the suspension on a car—it smooths out the ride.
And here’s the best part: you don’t need to spend hours at the gym. With just 10–15 minutes a few times per week, you can start feeling more confident and mobile.
What You’ll Need
Before we dive into the exercises, let’s get you set up.
- FitLife Resistance Bands – These color-coded bands give you options for light to heavy resistance. They’re senior-friendly and great for home use. You can grab a set here: [Your_Affiliate_Link_1].
- A sturdy chair – For seated moves and balance support.
- Comfortable shoes and a safe surface – Non-slip is best, especially if you’re stepping side to side.
Step 1: Warm Up Your Joints
Before you grab your band, let’s wake up your body. A warm-up gets blood flowing to stiff joints and helps prevent injury.

Try this:
- March gently in place for 1–2 minutes.
- Roll your shoulders in slow circles.
- Swing your arms side to side like you’re hugging yourself.
This doesn’t need to feel like a workout—just loosen things up. Imagine you’re oiling a squeaky hinge.
Step 2: Seated Band Leg Extensions (Knee Support)
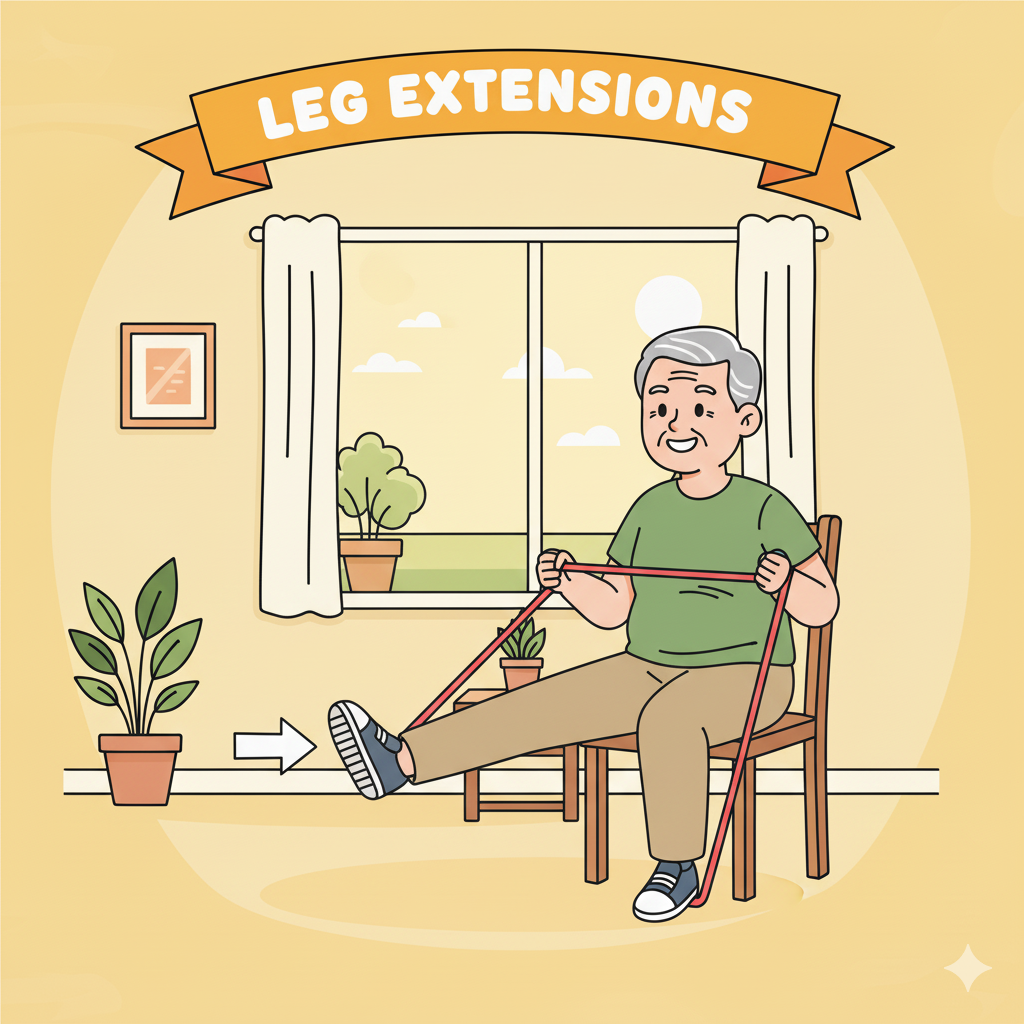
If your knees sometimes feel like rusty hinges, this one’s for you. It strengthens your quadriceps (front thigh muscles), which play a huge role in protecting your knees.
How to do it:
- Sit on a sturdy chair with both feet flat.
- Loop your resistance band around one ankle. Secure the other end under the chair leg.
- Slowly straighten your leg until it’s almost parallel with the floor.
- Lower it back down with control.
Do 10–12 reps per leg, rest, then repeat.
👉 Using a band like FitLife Resistance Bands makes it easy to adjust the difficulty—start with the lightest color and work up as you get stronger.
Step 3: Band Side Steps (Hip Support & Stability)
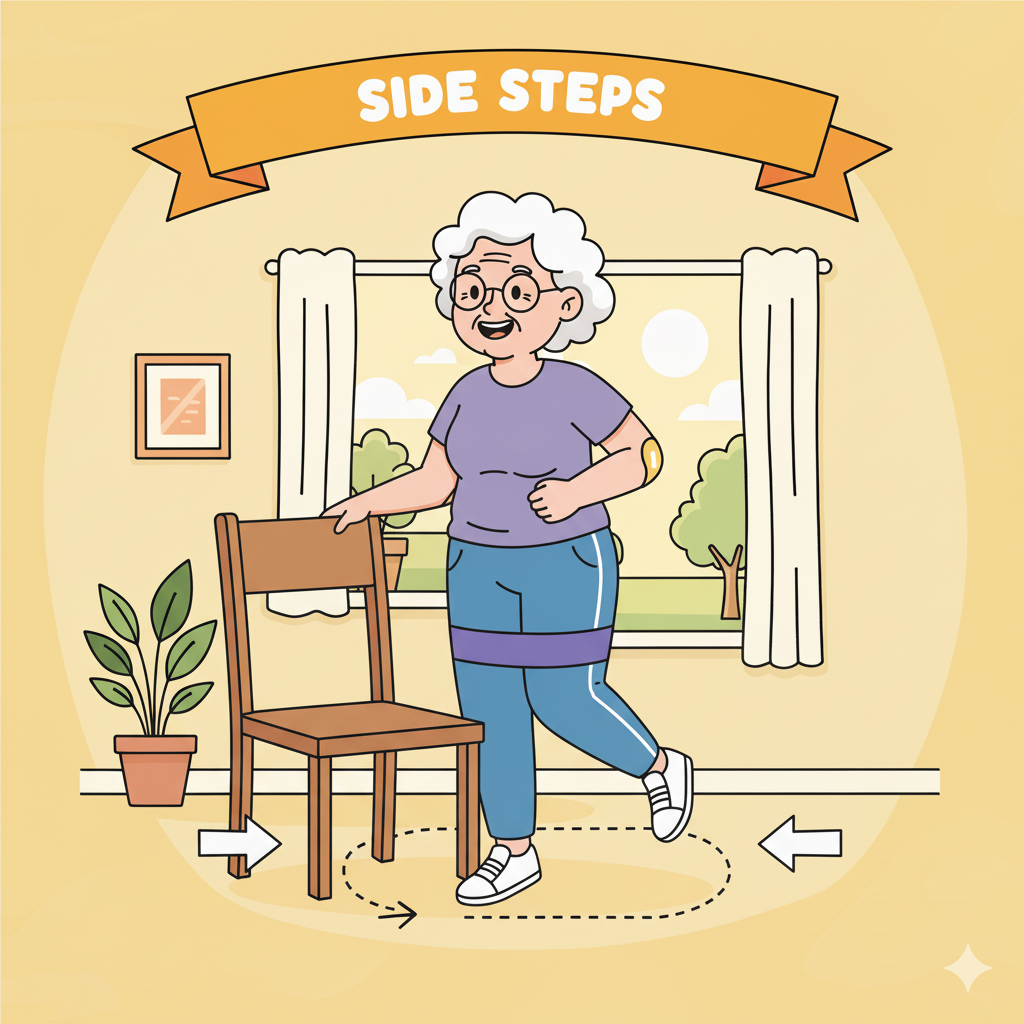
Strong hips are your secret weapon for preventing falls. This simple move works the muscles that stabilize your hips and keep your balance steady.
How to do it:
- Place the band just above your knees.
- Stand tall with feet hip-width apart, holding a chair for balance if needed.
- Step one foot to the side, then bring the other foot to follow.
- Take 10 steps to the right, then 10 steps to the left.
You’ll feel a gentle burn in the sides of your hips—that’s your stabilizers waking up.
Step 4: Band Pull-Apart (Shoulder & Posture Support)
Shoulder stiffness can make reaching overhead or carrying groceries tricky. This exercise strengthens your upper back and helps open up tight shoulders.
How to do it:
- Hold the band at chest height with both hands, arms straight.
- Gently pull the band apart, squeezing your shoulder blades together.
- Return slowly to the starting position.
Do 8–10 reps. Think about standing tall, like a proud superhero.
Step 5: Cool Down & Stretch
Now that you’ve worked your muscles, it’s time to relax them. Cooling down helps reduce stiffness the next day.
Try:
- Hamstring stretch – Sit on the chair, extend one leg straight, and lean forward gently.
- Overhead reach – Sit or stand tall, raise both arms up, and stretch toward the ceiling.
Hold each stretch for 20–30 seconds, breathing slowly.
Pro Tips for Success
- Start light. Always begin with the easiest band, even if it feels too easy. Progress comes quickly.
- Breathe. Exhale as you push against the band, inhale as you return. Don’t hold your breath.
- Listen to your body. A gentle muscle burn is fine. Sharp joint pain means stop, reset, or switch to a lighter band.
- Consistency beats intensity. Doing a little bit regularly is more effective than one big session once in a while.
Troubleshooting:
- If you feel pain, shorten your range of motion.
- If the band slips, adjust it higher on your legs or use a different surface.
A Day in the Life: How This Helps
Imagine this: You get out of bed in the morning, and instead of groaning at stiff knees, you stand up with more ease. When you head to the shop, you walk with confidence instead of worrying about losing balance. Even reaching into the cupboard feels easier because your shoulders don’t ache as much.
That’s the real reward here—not just exercising, but moving through daily life with less pain and more independence.
Building a Routine
The beauty of this routine is that it doesn’t take much time. Try aiming for:
- 2–3 sessions per week to start.
- Each session lasting 10–15 minutes.
- Gradually add more reps or sets as you feel stronger.
Consistency is your best friend. Even small steps add up to big improvements over time.
Final Thoughts
And there you have it—five simple, band-friendly moves that can help reduce joint pain, build strength, and give you more confidence in your day-to-day life.
You don’t need to be an athlete. You don’t need fancy equipment. You just need a little dedication and the right tools.
👉 Ready to get started? Grab your set of FitLife Resistance Bands today and take the first step toward stronger muscles and happier joints.
Your body will thank you. And every time you sit down, stand up, or walk with ease, you’ll know it was worth it.